| 5. Specifying a conversion | ||
|---|---|---|
 |  | |
| 5. Specifying a conversion | ||
|---|---|---|
| | | |
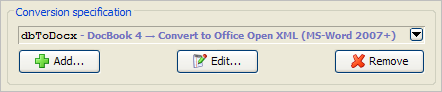
Click the button.
You may also select a conversion close to the one you intend to add and then click the button to modify it. In such case, do not forget to change the name of the edited conversion specification. By doing so, you'll add a new conversion rather than modify the existing one.
Give a name to your conversion specification and specify whether it creates a file or a directory.
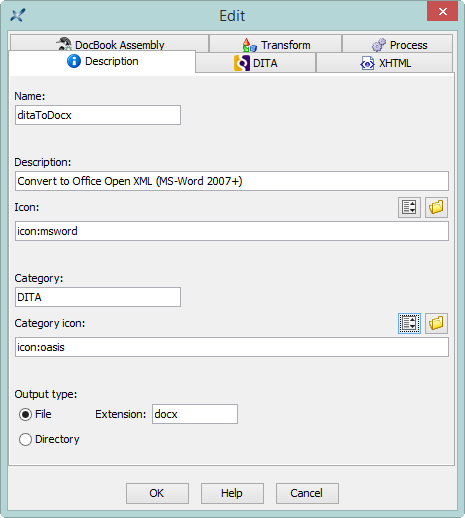
Specify the name of your conversion in the Name text field. This name must be an XML Name, that is, to make it simple, it cannot start with a digit and it cannot contain space characters.
Optionally describe what does your conversion in the Description text field.
Optionally associate an icon to your conversion.
This icon may be selected from a predefined list (button ![]() ) or found in an external file (button
) or found in an external file (button  ).
).
Optionally associate a category to your conversion. Generally, the type of the input document (DocBook, DITA, XHTML, etc) is used as a category.
Optionally associate an icon to the category.
Check the radio button if your conversion creates a output file and in such case, specify the standard extension used for such file in the Extension text field.
If your conversion requires/creates an output directory, check the radio button. In this case, note that:
The output directory will be created if it does not exist. If it exists, the output directory will be made empty before performing the conversion (you'll have to confirm this interactively).
You'll need to specify the output directory to the XSLT stylesheet (see the transform step) and/or to the process command (see the process step) by referencing the %O variable in an XSLT style parameter value and/or in the process command.
Optional step:
If your input document is a DITA topic, map or bookmap, you'll have to check the "" checkbox and fill some of the fields of the DITA tab. More information about this tab in Section 5.1, “Specifying the conversion of a DITA topic or map”.
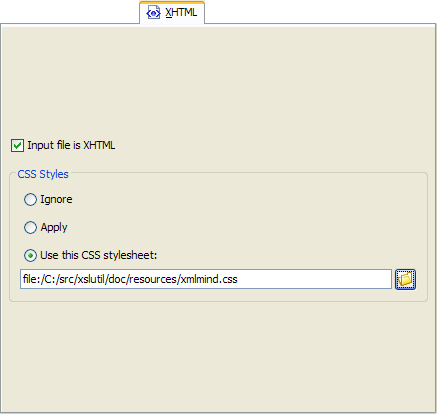
If your input document is is an XHTML 1.0, 1.1 or 5.0 file, you'll have to check the "" checkbox and optionally, fill some of the fields of the XHTML tab. More information about this tab in Section 5.2, “Specifying the conversion of an XHTML page”.
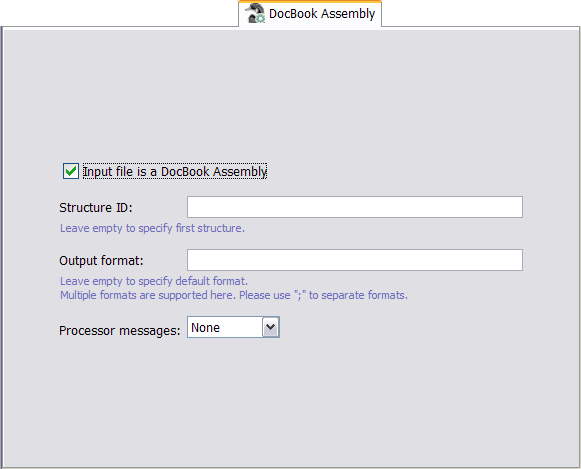
If your input document is a DocBook v5.1+ assembly (i.e. not a book, chapter, article, etc), you'll have check to the "Input file is a DocBook Assembly" checkbox and optionally, fill some of the fields of the "DocBook Assembly" tab. More information about this tab in Section 5.3, “Specifying the conversion of DocBook v5.1+ assembly”.
Specify the transform step, if any.
Check the checkbox if your conversion requires the XML input file to be transformed using an XSLT stylesheet.
Specify the URL of the XSLT stylesheet in the corresponding text field.
The button next to the text field allows you to choose this XSLT stylesheet using the standard file chooser dialog box.
Check the "" checkbox if the stylesheet you have chosen conforms to the XSLT Version 2 standard.
Optionally, specify one or more XSLT stylesheet parameters by clicking the button.
Note that an XSLT stylesheet parameter value may reference one or more of the following variables: %I, %X, %W, %T, %O, %S. (Appendix A, Variables describes all the variables supported by XMLmind XSL Utility.)
![[Tip]](images/tip.svg) | |
Select a parameter in the XSLT stylesheet parameters table by clicking on it and then, click the link to display its online documentation in your Web browser. Unfortunately, the link is often disabled (``grayed'') because many XSLT stylesheets are not documented and/or do not support any parameter. |
Specify the process step, if any.
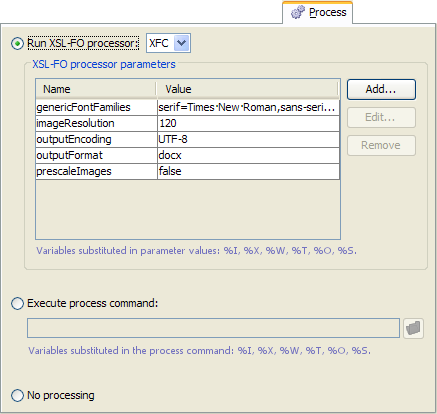
Check the radio button and select this XSL-FO processor using the corresponding combobox if your conversion requires processing an XSL-FO file generated by the transform step (or specified as the XML input file when the transform step is omitted).
Alternatively, check the radio button when your XSL-FO processor is not one of the three processors supported by XMLmind XSL Utility (example: Antenna House Formatter; see Appendix C, Using Antenna House Formatter as your XSL-FO processor) or when your conversion requires a specific post-transformation processing (see Appendix D, Using XMLmind XSL Utility to convert a DocBook 4 document to HTML Help (.chm file) for an example of such case).
![[Note]](images/note.svg) | About the process command |
|---|---|
The process command is evaluated (after all the The process command may reference one or more of the following variables: |
Finally, there are many cases where the transform step is all what you need (examples: conversion to HTML, Eclipse Help). In such case, simply check the radio button.
When the radio button has been checked, optionally specify one or more XSL-FO processor parameters by clicking the button.
These parameters are documented in Appendix B, XSL-FO processor parameters.
Note that an XSL-FO processor parameter value may reference one or more of the following variables: %I, %X, %W, %T, %O, %S. (Appendix A, Variables describes all the variables supported by XMLmind XSL Utility.)
Check the "" checkbox.
If you want to generate an HTML-based output format (XHTML, Web Help, etc), specify a relative path in the "Copy images and other resources to" field. For example, specify "images" to copy the image files to an images/ subdirectory created next to the output file.
If you want to generate an XSL-FO-based output format (PDF, RTF, ODT, DOCX, etc), you may generally leave empty the "Copy images and other resources to" field. When this field is empty, the generated XSL-FO intermediate file will reference the image files using absolute URLs. This is not a problem as all XSL-FO-based output formats can embed a copy of these images. However, specifying a value for this field is really needed at least for the two following use cases:
If your DITA document references audio or video files, specify "media" for example, to copy the audio or video files to a media/ subdirectory created next to the output file.
If your DITA document contains TeX/LaTeX math or if it contains MathML and the XSL-FO processor does not support MathML (e.g. RenderX XEP), specify "+" to let the DITA processor invoke image converters. These image converters can convert TeX/LaTeX math and MathML to SVG, an image format supported by all XSL-FO processors.
Special value "+" (plus sign) means: copy, and possibly convert, resource files to an “automatic” temporary directory. This automatic temporary directory will be deleted after the conversion is complete.
Select the format of the generated document from the "Target format" combobox.
Specifies the main language of the document. Examples: en, en-US, fr, fr-CA. This information is needed in order to sort the index entries. By default, this information is taken from the xml:lang attribute of the root element of the topic map (if any, "en" otherwise).
Apply specified conditional processing profile (a .ditaval file) to the topics.
The buttons found at the top/right of this field allow respectively to:
clear this field;
edit, or simply view, the .ditaval file specified in this field;
specify the URL of a .ditaval file by selecting it using a file chooser dialog box.
Specifies whether to automatically generate a Table of Contents and, if a Table of Contents is to be generated, where to generate it. Frontmatter means at the beginning of the document. Backmatter means at the end of the document.
This option, like List of Figures, List of Tables, List of Examples and Index, is mainly useful when working with maps or individual topics. When working with a bookmap, the preferred way to specify the location, if any, of a Table of Contents is to do it in the bookmap itself. In all cases, what's specified in the bookmap has priority over the value of this option.
Specifies whether to automatically generate a List of Figures and, if a List of Figures is to be generated, where to generate it.
Specifies whether to automatically generate a List of Tables and, if a List of Tables is to be generated, where to generate it.
Specifies whether to automatically generate a List of Examples and, if a List of Examples is to be generated, where to generate it.
Specifies whether to automatically generate an Index and, if an Index is to be generated, where to generate it.
Copy the image files (and other resources) referenced in the topics to specified directory. If specified path is relative, it is relative to the output directory. When this field is left empty, the generated file will reference the image files using absolute URLs, that is, these files are not copied anywhere. See examples.
Allowed values are Automatic, Single and None.
Chunk Automatic means: ignore the chunk specification found in the topic map and output a single chunk for the print medium; honor the chunk specification for the screen medium.
Chunk None means ignore the chunk specification found in the topic map and output a single chunk. As explained above, chunk None is implicit for some formats (PostScript, PDF, RTF, etc),
Both the None and Single values may be used to force the generation of a single output file. Chunk Single allows to reuse a map designed to output multiple HTML pages in order to generate a single HTML file or a PDF file.
The format of the generated document. This format must match the XSLT stylesheet specified in the "XSLT stylesheet" field of the Transform tab:
| Format | XSLT Stylesheet |
|---|---|
| XHTML 1.0 | |
| XHTML 1.1 | |
| HTML 4.01 | |
| XHTML 5 | |
| Web Help | |
| Web Help containing XHTML 5 pages | |
| HTML Help (.chm) | |
| Eclipse Help | |
| EPUB 2 | |
| EPUB 3 | |
| PostScript | |
| |
| OpenOffice (.odt, OpenOffice.org 2+) | |
| RTF (MS-Word 2000+) | |
| WordprocessingML (MS-Word 2003+) | |
| Office Open XML (.docx, MS-Word 2007+) | |
| XSL-FO | |
Of course, it is also possible to specify XSLT stylesheets which specialize the above ones.
Specifies the level of verbosity of the DITA preprocessor. Allowed values are (from not verbose to very verbose): None, Information, Verbose, Debug.
If the document being converted is an XHTML 1.0, 1.1 or 5.0 file then you must check the "" checkbox. Note that if you forget to do this, the conversion will work, but the images referenced in the XHTML input file will all be omitted in the output file and also, all the CSS styles possibly specified in the XHTML input file will be ignored.
| Converting plain HTML (that is, not XHTML) files |
|---|---|
XMLmind XSL Utility does not support converting plain HTML (that is, not XHTML) files. However XMLmind XSL Server does. Therefore when XMLmind XSL Utility is used to configure the conversions of XMLmind XSL Server, possibly using the |
The CSS styles options allow to specify what to do with the CSS styles possibly found in the XHTML input file. (These CSS styles are found in style attributes, style elements and link elements pointing to CSS stylesheets.)
Ignore all the CSS styles specified in the XHTML input file.
Apply to the intermediate XSL-FO file generated by the XHTML XSLT 2 stylesheets all the CSS styles specified in the XHTML input file.
This is the default option. It emulates —to a certain extent— how a Web browser typically renders an HTML page.
Ignore all the CSS styles specified in the XHTML input file. Instead apply to the intermediate XSL-FO file generated by the XHTML XSLT 2 stylesheets all the styles found in specified CSS stylesheet.
If the document being converted is DocBook v5.1+ assembly (i.e. not a book, chapter, article, etc) then you must check the "Input file is a DocBook Assembly" checkbox.
An assembly may contain several structure elements. A structure element may specify several output formats (web, print, etc)[3]. When this is the case, you'll want to specify which structure you want to convert and also which output format you target.
The value of the xml:id attribute of the structure element to be converted. By default, it's the first structure found in the assembly.
One of the output formats specified in the structure selected using the above "Structure ID" field. By default, it's the value of the defaultformat attribute of the structure if any, the “implicit format” otherwise.
The “implicit format” matches output, filterin, filterout elements without any outputformat attribute.
Multiple output formats separated by ";" may be specified. For example, "web;print" means output format is "web" OR "print".
Specifies the level of verbosity of the assembly processor. Allowed values are (from not verbose to very verbose): None, Information, Verbose, Debug.
The "XSLT stylesheet" frame found at the top of the Transform tab has buttons allowing to easily customize the XSLT stylesheet currently selected.
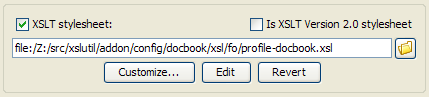
If you already have an XSLT stylesheet customization, simply specify its location by clicking , the "Choose XSLT stylesheet" button.
However if you do this, please make sure that your XSLT stylesheet customization imports the stock XSLT stylesheet by using an URL starting with "xslutil-config:". DITA example:
xsl:import href="xslutil-config:dita/xsl/fo/fo.xsl"/>
If you want to create an XSLT stylesheet customization, please proceed as follows:
Click .
You are prompted for the .xsl save file which is to contain your customization.
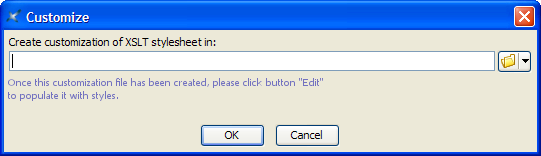
Clicking creates a custom XSLT stylesheet based on the currently selected stock XSLT stylesheet.
A custom XSLT stylesheet created this way merely imports the original XSLT stylesheet. Example:
<xsl:stylesheet xmlns:xsl="http://www.w3.org/1999/XSL/Transform"
                version="1.0">
  <xsl:import href="xslutil-config:docbook/xsl/fo/docbook.xsl"/>
  <!-- REDEFINE PARAMETERS AND ATTRIBUTE-SETS HERE -->
</xsl:stylesheet>
Note that it's not possible to create a customization of a custom XSLT stylesheet.
Click .
If the custom XSLT stylesheet has been created using the button, this button starts the "XMLmind XSL Customizer" application in order to edit it. Otherwise, this button starts a helper application allowing to edit XSLT files.
| |
Clicking while keep the Shift key pressed allows to start a helper application rather than the "XMLmind XSL Customizer" application. |
If you have customized an XSLT stylesheet and want to revert to the original XSLT stylesheet, simply click .
The "XMLmind XSL Customizer" application is a companion application embedded in XMLmind XML Editor and XMLmind XSL Utility.
This application is invoked by clicking the XSLT stylesheet button found in XMLmind XML Editor and XMLmind XSL Utility. It allows to modify a custom XSLT stylesheet created by clicking the XSLT stylesheet button found in XMLmind XML Editor and XMLmind XSL Utility.
A custom XSLT stylesheet created this way merely imports the stock XSLT stylesheet. Example:
<?xml version="1.0" encoding="UTF-8"?>
<?stylesheet-label ACME Corp. Styles?>
<xsl:stylesheet version="2.0" xmlns:xsl="http://www.w3.org/1999/XSL/Transform">
  <xsl:import href="dita-config:xsl/fo/fo.xsl"/>
  <!-- REDEFINE PARAMETERS AND ATTRIBUTE-SETS HERE -->
</xsl:stylesheet>
"XMLmind XSL Customizer" is not an XSLT editor. However it allows to:
add or change attributes in some of the attribute sets supported by the XSLT stylesheet,
change the value of some of the parameters supported by the XSLT stylesheet,
and this, without prior knowledge of XSLT.
XSLT stylesheets are often (but not always) parameterized by the means of:
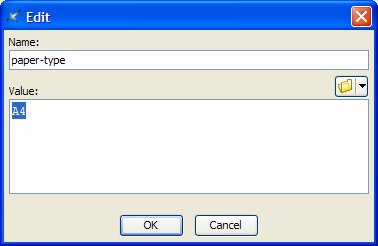
Parameters. DocBook XSL stylesheet example:
<xsl:param name="paper.type">USletter
</xsl:param>
Attribute sets. DocBook XSL stylesheet example:
<xsl:attribute-set name="monospace.verbatim.properties"<xsl:attribute name="wrap-option">no-wrap</xsl:attribute>
</xsl:attribute-set>
The name of the attribute set is " | |
This attribute set includes two other attribute sets: | |
This attribute set directly contains attribute | |
This attribute set directly contains attribute |
An attribute set can contain any attribute. However attribute sets are mainly used in XSLT stylesheets which generate XSL-FO. The XSL-FO intermediate file generated by the XSLT stylesheet is then processed by programs such as Apache FOP, RenderX XEP, Antenna House XSL Formatter, XMLmind XSL-FO Converter, etc, in order to create the deliverable: PDF, PostScript, RTF, .docx, .odt, etc. The attribute sets are used in this case because they are the only way to influence the look of the deliverable. Such attribute sets contain standard XSL-FO presentation attributes (very similar to the CSS properties): color, font-family, line-height, margin-left, etc.

Create a customization of an existing XSLT stylesheet. This button displays the standard file chooser dialog box allowing to choose the XSLT stylesheet for which a customization is to be created.

Open a custom XSLT stylesheet previously created by clicking the button. This button displays the standard file chooser dialog box allowing to choose the custom XSLT stylesheet to be opened.

Close currently opened XSLT stylesheet.

Save the changes made to currently opened XSLT stylesheet.

Save currently opened XSLT stylesheet to a different file.

Display this online help.

Close "XMLmind XSL Customizer" main window.
| |
Because "XMLmind XSL Customizer" is an (embedded) application and not a modal dialog box, you can keep it open while converting an XML document in XMLmind XML Editor or in XMLmind XSL Utility. This allows to experiment with attribute sets and parameters until you are satisfied with the result of the conversion. |
Short description of the currently opened custom XSLT stylesheet. XMLmind XML Editor requires a custom XSLT stylesheet to have such description.
Read-only text field: URI of the stock XSLT stylesheet for which the currently opened XSLT stylesheet is a customization.
Add an attribute to one of the attribute sets supported by currently opened XSLT stylesheet.
This button displays the Add/Edit attribute dialog box. How to use this dialog box is described in the example below.
| |
XMLmind XSL Customizer is designed for users who cannot “program in XSLT”. These users are expected to enter literal values, not XSLT elements, in the Custom value field. For example, they are expected to enter something like: 20pt as the value of the <xsl:value-of select="$body.font.master * 2"/> <xsl:text>pt</xsl:text> However, if the user happens to know what she/he is doing and nevertheless enters one or more XML nodes in the Custom value field, then XMLmind XSL Customizer will ask her/him to confirm that this is really what she/he wants and make it work. |
Modify currently selected attribute.
This button displays the Add/Edit attribute dialog box.
Remove currently selected attribute.
Start the web browser and make it display the page containing the documentation about currently selected attribute. This button is disabled (grayed) when such documentation is not available. For now, only the DocBook XSL Stylesheets provide some documentation for their attribute sets.
Set one of the parameters supported by currently opened XSLT stylesheet.
This button displays the Add/Edit parameter dialog box. How to use this dialog box is described in the example below.
| |
XMLmind XSL Customizer is designed for users who cannot “program in XSLT”. These users are expected to enter literal values, not XSLT elements, in the Custom value field. For example, they are expected to enter something like: 40pt as the value of the <xsl:value-of select="$body.font.master * 4"/> <xsl:text>pt</xsl:text> However, if the user happens to know what she/he is doing and nevertheless enters one or more XML nodes in the Custom value field, then XMLmind XSL Customizer will ask her/him to confirm that this is really what she/he wants and make it work. |
Modify currently selected parameter.
This button displays the Add/Edit parameter dialog box.
Remove currently selected parameter.
Start the web browser and make it display the page containing the documentation about currently selected parameter. This button is disabled (grayed) when such documentation is not available.
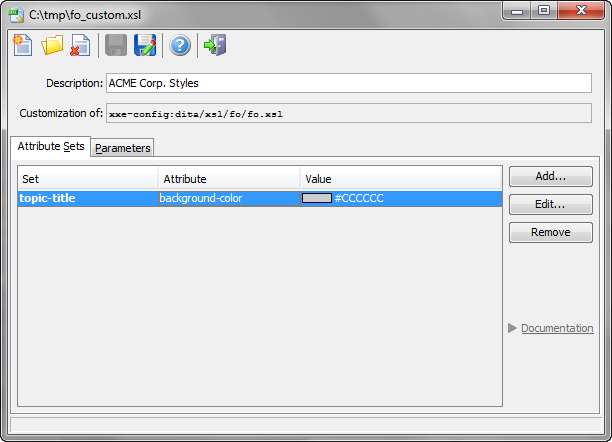
This is specified by adding attribute background-color=#CCCCCC to the attribute-set called topic-title.
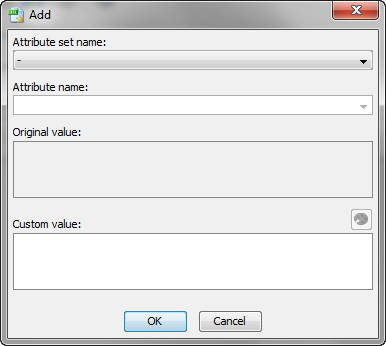
Select the Attribute Sets tab.
Click . This displays the Add/Edit attribute dialog box.
In the "Attribute set name:" combobox, select topic-title.
In the "Attribute:" combobox, type "background-color" or select this commonly used attribute from the drop down list.
The "Original value:" read-only text field remains empty, indicating that the stock XSLT stylesheet does not specify attribute topic-title/background-color.
In the "Custom value:" field, type "#CCCCCC".
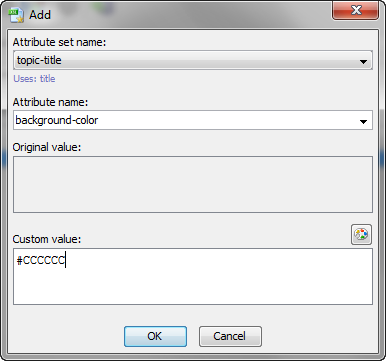
Or more simply, click  "" and use the
 background-color editor to specify a light gray color.
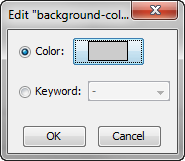
Click to close the dialog box.
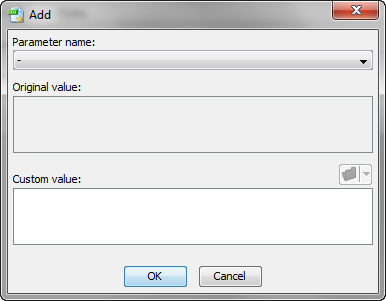
This is specified by setting parameter base-font-size to 12pt.
Select the Parameters tab.
Click . This displays the Add/Edit parameter dialog box.
In the "Parameter name:" combobox, select base-font-size.
The "Original value:" read-only text field changes to "10pt", which is the value of parameter base-font-size specified in the stock XSLT stylesheet.
In the "Custom value:" field, type "12pt".
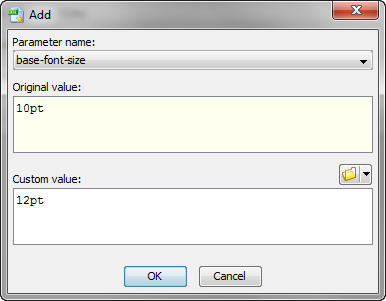
Click to close the dialog box.
[3] The outputformat attribute set on output, filterin, filterout elements allows to specify “classes” of output formats rather than actual output formats (PDF, DOCX, EPUB, etc).
| | | |
| 4. Changing the parameters of a conversion |  | 6. User preferences |