| |
| |
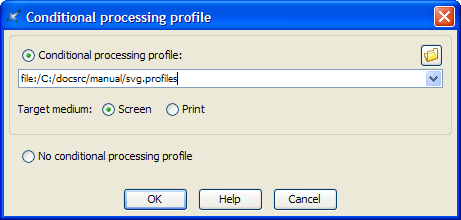
RememberNote that the values specified in
the above dialog box are remembered for use during subsequent
editing sessions. For example, in the case of the above
screenshot, if you reopen the same map later, this map will still
be filtered by
print.ditaval and its target
medium will still be Print, and this even if you do not
explicitly use menu item during the new editing session. |
NoteThe "Convert to RTF",
WML, DOCX,
ODT, entries documented below are absent in
XMLmind DITA Editor. They are found only in XMLmind XML
Editor.
|
AttentionThe items of this menu are
all disabled if the document being edited needs to be saved to
disk.
|
hhc.exe, as the helper application
associated to files having a "hhp" extension. This
can be specified by using the
Preferences dialog box,
Helper Applications section.| Button | Description | ||
 Insert Topicref Before Insert Topicref Before |
Insert a topicref before selected topicref. Displays a
dialog box
allowing to specify the
@href attribute and/or the
@navtitle of the topicref to be
inserted. |
||
 Insert Topicref Into Insert Topicref Into |
Insert a topicref as the last child of selected
topicref. Displays a dialog box allowing
to specify the
@href attribute and/or the
@navtitle of the topicref to be
inserted. |
||
 Insert Topicref After Insert Topicref After |
Insert a topicref after selected topicref. Displays a
dialog box
allowing to specify the
@href attribute and/or the
@navtitle of the topicref to be
inserted. |
||
 Edit Topicref
 |
Displays a dialog box allowing
to change the
@href attribute and/or the
@navtitle of selected topicref. |
||
 Move
Up Move
Up |
Move selected element up, that is, swap it with its
preceding sibling node. Requires the element to be explicitly
selected.
|
||
 Move
Down Move
Down |
Move selected element down, that is, swap it with its
following sibling node. Requires the element to be explicitly
selected.
|
||
 Promote
 |
Decrease the nesting level of selected topicref,
possibly changing its type (e.g. a
<topicref>
element becomes a <chapter>
element). |
||
 Demote
 |
Increase the nesting level of selected topicref,
possibly changing its type (e.g. a
<chapter>
element becomes a <topicref>
element). |
||
 Add reltable Add reltable |
Displays a menu allowing to add a
<reltable> without or with a
<relheader> after selected element.
|
||
 Reltable
column Reltable
column |
Displays a menu similar to the "Table column" menu found in Table editor. | ||
 Reltable row Reltable row |
Displays a menu similar to the "Table row" menu found in Table editor. | ||
 Show Level Show Level |
Displays a menu containing "Show Level
1", "Show Level 2", ...,
"Show Level 9" items. "Show Level N"
means: expand all the collapsible elements of the map up to nesting
level N and recursively collapse all the collapsible elements
having a nesting level greater than N.
|
||
 Edit All Topics R/O Edit All Topics R/O |
Opens in read-only mode all the topics and maps
referenced in the selected elements and their
descendants.
|
||
 Edit All Topics or Maps Edit All Topics or Maps |
Opens in normal read-write mode all the topics and maps
referenced in the selected elements and their
descendants.
|
<bookabstract> (a kind of
<topicref> found in the
<frontmatter> of a
<bookmap>)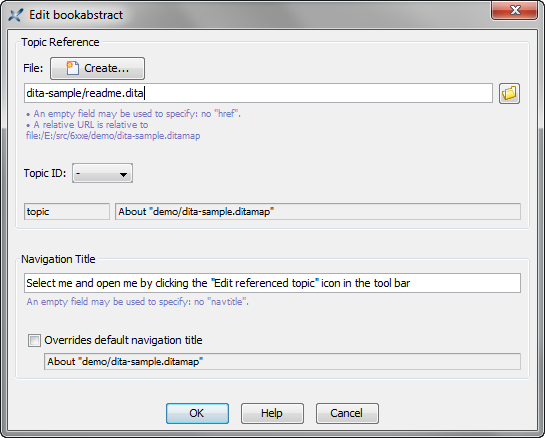
@href attribute of the
edited or newly inserted <topicref>:
 Browse button
and use the file chooser to select a file containing one or
more DITA topics.
Browse button
and use the file chooser to select a file containing one or
more DITA topics.
@href attribute.@href attribute of the
edited or newly inserted <topicref> to a
newly created topic, click the  Create button.
This displays the same dialog box as menu item . Make sure to create a DITA topic.
Create button.
This displays the same dialog box as menu item . Make sure to create a DITA topic.@navtitle attribute of
the edited or newly inserted <topicref>:
<topicref> in
the "Navigation Title" field.<topicref> title to replace the
referenced topic title in the deliverable (HTML, PDF, RTF,
etc) which is to be generated out of the DITA map. This option
adds a locktitle="yes" attribute to the edited or
newly inserted <topicref>.| Action | Description |
| Up | If a topicref is selected, select preceding topicref; elsewhere, default behavior. |
| Down | If a topicref is selected, select following topicref; elsewhere, default behavior. |
| Enter | Insert Topicref After |
| Shift-Enter | Insert Topicref Before |
| Ctrl+Shift-Enter | Insert Topicref Into |
| Esc e | Edit Topicref |
| Alt+Shift-Up | Move Up |
| Alt+Shift-Down | Move Down |
| Alt+Shift-Left | Promote |
| Alt+Shift-Right | Demote |
| Double-click | On a topicref, Edit Referenced Topic or Map; elsewhere default behavior. |
| Esc o | Edit Referenced Topic or Map |
| Esc O | Edit Referenced Topic or Map in Read-Only Mode |
| Drag | Dragging selected topicref drags the value of its
@href attribute. Elsewhere, default drag
behavior. |
| Drop | Dropping a file or URL onto a topicref displays a popup menu containing Insert Topicref Before, Insert Topicref Into, Insert Topicref After, Edit Topicref and Cancel. Elsewhere, default drop behavior. |
| |