| 1. The DocBook menu | ||
|---|---|---|
 |  | |
| 1. The DocBook menu | ||
|---|---|---|
| | | |
This menu item is present only if the document being edited is a DocBook version 4 document. Converts DocBook version 4 document being edited it to DocBook version 5.0, 5.1 or 5.2. A dialog box is displayed to allow choosing a DocBook version. A file chooser is displayed to allow choosing a save file for the DocBook 5 document.
Note that this command does not automatically upgrade the documents referenced in the document being edited (e.g. a chapter included in a book). This has to be done manually for each referenced document. Once this is done, the xi:include elements have to be edited by hand in the master DocBook 5 document after using → → in XMLmind XML Editor - Online Help.
Displays a dialog box allowing to declare the collection of DocBook documents in which olink is used for cross-referencing. More information in Specifying the set of olink-ed documents.

Import the HTML copied to the clipboard by word processors or web browsers and intelligently paste it into the DocBook document being edited.
Extensive efforts are made to decently support the “non-filtered HTML” copied by MS-Word to the clipboard.
When an application other than MS-Word is used, the quality of the result you'll get in XXE highly depends on what has been copied to the clipboard. In all cases, XXE tries very hard to import something simple, clean and valid at the expense of the fidelity to the original data.
In addition to HTML, this menu entry can also import  Markdown whose text source has been copied to the clipboard by text editor or web browsers. Markdown support is documented in the description pane of the "Install Add-ons" dialog box, Uninstall tab, when the "Paste from Word Processor or Browser" add-on is selected. This documentation is also found in "Paste from Word Processor or Browser".
The pasted data replaces the text or node selection if any. When there is no selection, XMLmind XML Editor automatically determines a valid insertion location at or following the caret position.
If XMLmind XML Editor fails to find such valid insertion location, the rich text is converted to valid DocBook and then copied to the clipboard, overwriting the original data put there by the third-party application. This allows to use the “normal” , or commands to paste the data elsewhere in the document.
![[Tip]](images/tip.svg) | |
This menu entry allows not only to paste snippets copied from word processors or web browsers, but also to import entire documents or HTML pages. In order to import the entire document into XXE:
|
| |
If, using MS-Word, you want to copy a piece of text rather than a paragraph, do not include the hidden character found at the very end of a paragraph (the paragraph mark) in your selection. |
The following entries of this submenu allow to paste the plain text copied to the clipboard, typically using a third-party word processor or spreadsheet, as:
one or more paragraphs,
OR a programlisting element,
OR one or more list items,
OR an itemized list,
OR one or more table rows,
OR a table.
The last two menu entries assume that each text line specifies a table row and that, within a text line, the contents of the table cells are separated by tab characters.
| |
If you need to paste the copied text as an ordered list, first paste this text as an itemized list then convert the pasted list to an ordered list using → (Ctrl+T). |
The following entries of this submenu allow to paste the image copied to the clipboard as:
inlinemediaobject,
mediaobject,
figure.
Menu entry "" replaces the text or node selection if any. When there is no selection, this menu entry pastes its element at caret position (just like → ).
All the other menu entries also replace the text or node selection if any. When there is no selection, these menu entries paste their elements at any valid position in the document following the caret position.
,  [2]
[2]Keyboard shortcut Ctrl+Shift+SPACE. Replace Markdown markup found all the text nodes of explicitly or implicitly selected element by equivalent DocBook elements. Supported Markdown markup: italic, bold, code, highlight (replaced by emphasis role=underline), subscript, superscript, link, image, heading (replaced by bridgehead with attribute renderas), unordered list item, ordered list item.
DocBook 5 example (notice the space character after "1."; this space character is required after all the different “block prefixes” "#", "##", "-", "*", "1.", etc):
<para>* <trademark>Dart</trademark> is a *programming language*.
See [Dart](https://dart.dev/).</para>
is replaced by:
<itemizedlist>
  <listitem>
    <para><trademark>Dart</trademark> is a
    <emphasis>programming language</emphasis>. See
    <link xlink:href="https://dart.dev/">Dart</link></para>
  </listitem>
</itemizedlist>
Converts an “informal element” to/from a “formal element” having a title.
This command currently works for informaltable/table (CALS tables only, not HTML tables), informalfigure/figure and informalexample/example.
Links a sequence of callout elements to the corresponding sequence of co or area elements (and, of course, also the other way round).
Useful information about callouts is found in DocBook XSL: The Complete Guide by Bob Stayton: Program listings, Annotating program listings, Callouts.
In order to use this command, you need to:
Create a programlisting containing a number of co elements. No need to specify the ID or linkends attributes for these co elements.
Note that this command also works for any element containing area elements rather than co elements (e.g. a programlistingco).
Add a calloutlist element somewhere after the programlisting. No need to specify the ID or arearefs attributes for the callout elements.
![[Important]](images/important.svg) | |
Make sure to create exactly the same number of |
Explicitly select the node range comprising both the programlisting and the calloutlist elements.
In fact, you can explicitly or implicitly select any element containing, at any nesting level, a sequence of co or area elements followed by a sequence of callout elements. For example, if your programlisting and calloutlist elements are contained in a programlistingco element, simply click anywhere inside the programlistingco element.
Select → .
The following dialog box is displayed:
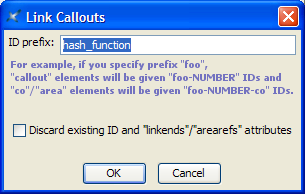
Specify a prefix for the IDs which will be automatically generated for the co and the callout elements. The links (linkends and arearefs attributes) between the co and the callout elements of course need to refer to these IDs.
Click .
Notice that the above dialog box has a "Discard existing ID and linkends/arearefs attributes" checkbox. This checkbox is needed because the "" command has been designed to be used, not only on newly created programlisting plus calloutlist elements, but also on existing, possibly hand-written, possibly complex[3] programlisting plus calloutlist elements.
When the co and callout elements found inside the node selection are found to already have ID attributes, this checkbox is enabled and, by default, unchecked. When this is the case, running this command will affect only the newly created co and callout elements. All the existing IDs and links will be left unchanged.
| This command also works with image maps |
|---|---|
→ is also designed to work with the DocBook equivalent of HTML image maps. An easy way to create an image map pointing to a
|
If the caret is anywhere inside an indexterm element or if a single element or node is explicitly selected anywhere inside an indexterm element, this menu item displays an indexterm editor dialog box allowing to modify this indexterm element.
Otherwise, this menu item displays an indexterm editor dialog box allowing to create a new indexterm element and then to insert it at caret position.
| |
If some text has been selected, field Term of the dialog box is automatically initialized with the text selection. Therefore the simplest way to create an |
Move selected element up, that is, swap it with its preceding sibling node. Requires the element to be explicitly selected.
Move selected element down, that is, swap it with its following sibling node. Requires the element to be explicitly selected.
To make it simple, increase the level of selected subsection (e.g. a sect2 element is converted to a sect1 element).
Requires a ``subsection'' (section, sect1, sect2, sect3, sect4 or sect5) or an element which is contained in the body[4] of the section to be explicitly selected.
If a subsection is selected, this subsection becomes a sibling of its parent section. Example: sect2 element having id="C" is ``promoted'':
<sect1 id="A">...
  <sect2 id="B">...
  <sect2 id="C">...
  <sect2 id="D">...
This results in:
<sect1 id="A">...
  <sect2 id="B">...
<sect1 id="C">...
  <sect2 id="D">...
If another type of child element is selected, this element is wrapped in a newly created section which becomes a sibling of its parent section. Example: para element having id="C" is ``promoted'':
<sect1 id="A">...
  <para id="B">...
  <para id="C">...
  <sect2 id="D">...
This results in:
<sect1 id="A">...
  <para id="B">...
<sect1>...
  <para id="C">...
<sect2 id="D">...To make it simple, decrease the level of selected section (e.g. a sect1 element is converted to a sect2 element).
Requires a ``section'' (chapter, appendix, section, sect1, sect2, sect3 or sect4) or an element which is contained in the body[5] of the section to be explicitly selected.
If a section is selected and if this section is preceded by a section of the same type, this section becomes a subsection of its preceding sibling. Example: sect1 element having id="C" is ``demoted'':
<sect1 id="A">...
  <para id="B">...
<sect1 id="C">...
  <para id="D">...
This results in:
<sect1 id="A">...
  <para id="B">...
  <sect2 id="C">...
    <para id="D">...
If a section is selected and if this section is not preceded by a section of the same type, a new section is created and selected section becomes a subsection of this new section. Example: sect2 element having id="C" is ``demoted'':
<sect1 id="A">...
  <para id="B">...
  <sect2 id="C">...
    <para id="D">...
This results in:to declare the collection of DocBook documents in which olink is used for cross-referencing. How to do this is explained in next section.
<sect1 id="A">...
  <para id="B">...
  <sect2>...
    <sect3 id="C">...
      <para id="D">...
If another type of child element is selected, this element and all the other ``body elements'' which follow it are wrapped in a newly created subsection. Example: para element having id="C" is ``demoted'':
<sect1 id="A">...
  <para id="B">...
  <para id="C">...
  <para id="D">...
  <sect2 id="E">...
This results in:
<sect1 id="A">...
  <para id="B">...
  <sect2>...
    <para id="C">...
    <para id="D">...
  <sect2 id="E">...
Keyboard shortcut F8. Checks all the links to external resources found in the document being edited. All kinds of external resources are checked for existence: images, audio, video, PDF documents, HTML pages, etc. When the resource is an HTML page and the link ends with a fragment (e.g. "#bar" in "../doc/foo.html#bar") then this fragment is also checked for existence.
![[Note]](images/note.svg) | |
The "", WML, DOCX, ODT, entries documented below are absent in XMLmind DocBook Editor. They are found only in XMLmind XML Editor. |
| Using the profiling stylesheets |
|---|---|
Conditional processing, also called profiling or conditional text, means that you can create a single XML document with some elements marked as conditional. When you process such a document, you can specify which conditions apply for that version of the output, and the XSLT stylesheet will include or exclude the marked text to satisfy the conditions. More information in DocBook XSL: The Complete Guide. If you need to use the profiling XSLT stylesheets rather than the regular ones, use → → in XMLmind XML Editor - Online Help and select the corresponding stylesheet. |
Converts the document being edited to multi page or single page HTML.
| Generating XHTML rather than HTML |
|---|---|
If you prefer to generate XHTML 1.0 or 5 rather than plain HTML, use → → and select the corresponding stylesheet. |
Converts the document being edited to Web Help containing XHTML 5 pages.
| |
The Web Help is generated by XMLmind Web Help Compiler and not by the XSLT stylesheets generating Web.Help which are part of the stock DocBook XSL Stylesheets. Therefore, you cannot use any of XSLT stylesheet parameters having a name starting with " Instead please use any of the parameter documented in "XMLmind Web Help Compiler Manual, Parameters" after prefixing their names with " |
Converts the document being edited to a .chm file. This command is disabled on platforms other than Windows.
For this command to work, the HTML Help compiler, hhc.exe, must have been declared as the helper application associated to files having a "hhp" extension. This can be specified by using the Preferences dialog box, Helper Applications section.
Converts the document being edited to Eclipse Help.
If you want Eclipse to display your Eclipse Help document in its help viewer, you must
specify the following XSLT stylesheet parameters: eclipse.plugin.name, eclipse.plugin.id, eclipse.plugin.provider, prior to selecting → → ;
give to the output folder the name specified in eclipse.plugin.id;
copy the output folder containing the generated Eclipse Help document to eclipse_install_dir/dropins/eclipse_install_dir/plugins/
Converts the document being edited to EPUB.
Converts the document being edited to RTF (Rich Text Format) using XMLmind FO Converter (see http://www.xmlmind.com/foconverter/). The document generated by this command can be edited and printed using Microsoft® Word 2000 and above.
Converts the document being edited to WordprocessingML using XMLmind FO Converter. The document generated by this command can be edited and printed using Microsoft® Word 2003 and above.
Converts the document being edited to Office Open XML (.docx file) using XMLmind FO Converter. The document generated by this command can be edited and printed using Microsoft® Word 2007 and above.
Converts the document being edited to OpenDocument (.odt file) using XMLmind FO Converter. The document generated by this command can be edited and printed using OpenOffice.org 2.
Converts the document being edited to PDF (Adobe® Portable Document Format, also known as Acrobat®) using RenderX XEP (see http://www.renderx.com/), if its plug-in has been installed, and Apache FOP otherwise (see http://xmlgraphics.apache.org/fop/).
All the above Convert commands display the URL chooser dialog box rather than the standard file chooser dialog box.
For all Convert commands except for the "" command, you must specify the URL (Uniform Resource Locator) of a save file. The "" command creates multiple HTML pages with a first page called index.html, therefore you need to specify the URL of a save directory.
Note that these commands can create directories on the fly, if needed to. For example, if you specify http://www.acme.com/docs/report43/mydoc.html as the URL of the save file and if directory report43/ does not exist, this directory will be created during command execution.
The olink element allows to create links between different documents. Once the olink element has been inserted in a document, you have to specify a value for its targetdoc attribute and optionally, a value for its targetptr attribute. The targetdoc attribute contains the symbolic name of the document which is the target of the olink. The targetptr attribute is the ID of an element found in the target document. More information about the olink element and how this element is processed by the DocBook XSL stylesheets in DocBook XSL: The Complete Guide, by Bob Stayton.
The easiest way to specify the targetdoc and targetptr attributes of an olink element is to right-click anywhere inside the olink element. Doing this displays a contextual menu containing "" in addition to "". Menu item "" displays the following specialized dialog box:
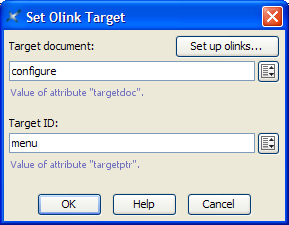
The Attributes tool also can help you specify a value for the targetdoc attribute by listing[6] all the symbolic names of the target documents. Once the targetdoc attribute has been specified, the Attributes tool can help you specify a value for the targetptr attribute by listing all the IDs found in the target document.
However for the two above facilities to work, you first need to declare the collection of DocBook documents in which olink is used for cross-referencing. How to do this is explained in next section.
Procedure:
Select → . This will display the following dialog box:
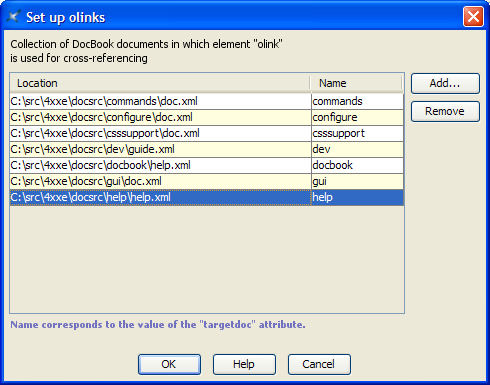
Click . This will display this other dialog box.
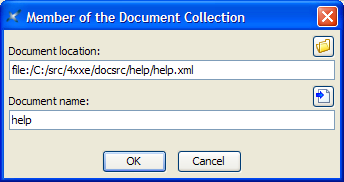
Use the button to specify the URL of a document which is a member of the collection. In the above screenshot, this URL is "file:/C:/src/4xxe/docsrc/help/help.xml".
| |
You can mix DocBook 4 and DocBook 5 documents within the same collection. |
Type the symbolic name of the document in the Document name text field. In the above screenshot, this name is "help".
This name, which cannot contain space characters, corresponds to a possible value for the targetdoc attribute. The same symbolic name must also be used in the target database document. Example:
<!DOCTYPE targetset
  SYSTEM "../../addon/config/docbook/xsl/common/targetdatabase.dtd" [
  ...
  <!ENTITY help SYSTEM "help_html.targets">
  ...
]>
<targetset>
  <sitemap>
    <dir name="doc">
      ...
      <dir name="help">
        <document targetdoc="help">
          &help;
        </document>
      </dir>
      ...
    </dir>
  </sitemap>
</targetset> | |
Instead of typing the symbolic name of the document referenced in the Document location text field, it's also possible to click the Using the ID of the root element as the symbolic name of an “olink-ed document” is a common practice. However, before using this button, make sure that this practice is actually used in your organization. |
Repeat steps 1 to 4 until you have declared all the members of your document collection.
This setup is done once for all for both the DocBook 4 and 5 configurations. However you may add or remove members to/from your document collection at any time.
| |
XXE can help you create |
This dialog box, displayed by menu item → , allows to edit the selected indexterm element if any, or to create a new indexterm element and then insert it at caret position otherwise.
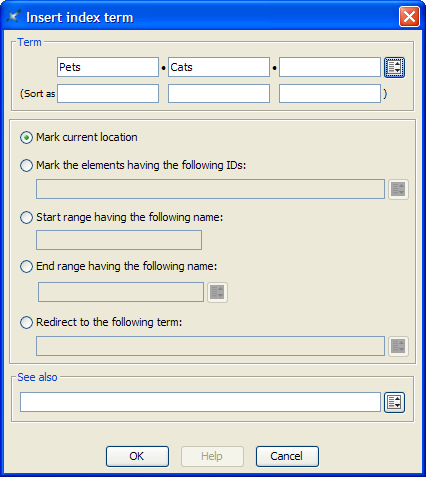
We'll explain with examples how to use the indexterm editor.
If you want to get this kind of entry in your back of the book index:
P
Pet 12
specify Term=Pet.
Back of the book index:
P
Pet
    Cat 26
specify Term=Pet, Term #2=Cat.
Back of the book index:
P
"+" 54
specify Term="+", Sort as=plus. Without this Sort as specification, the index entry corresponding to "+" would have been found in the Symbols category:
Symbols
"*" 53, 78
"+" 54
"-" 55, 91-95
...
Back of the book index:
D
Domesticated animals 34 See also Pet
specify Term=Domesticated animals, See also=Pet.
Note that the content of the See also field must refer to an existing index entry. That's why instead of typing "Pet", you can select this index entry by using the dialog box displayed by the button found at the right of the See also row.
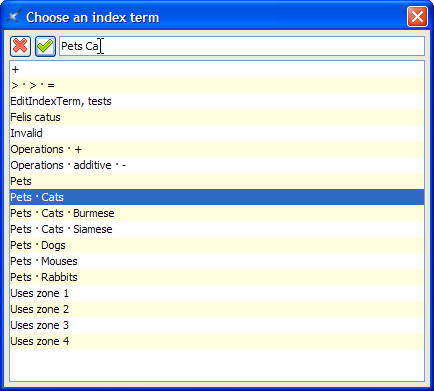
The above dialog box supports autocompletion. Note that if, for example, you want specify compound term "Pet Cat Siamese", you must type a space character between each simple term.
Back of the book index:
I
IT See Information Technology
specify Term=IT, select "Redirect to the following term" then specify Redirect=Information Technology. (In the above example, notice that IT has no associated page number.)
Like See Also, the content of the Redirect field must refer to an existing index entry. Unlike See Also, a Redirect entry is merely a redirection to an actual index entry.
Back of the book index:
O
Operation
    Additive
        "+" 87-90
Insert a first indexterm element at the beginning the range (this will give us page number 87).
In order to do that, use → and specify Term=Operation, Term #2=Additive, Term #3="+", Sort as #3=plus.
Then check "Start range having the following name" and give your indexterm element an ID by specifying "plus_reference" in the Start range field.
Insert another indexterm element at the end the range (this will give us page number 90).
In order to do that, use → , check "End range having the following name" and specify the same ID, "plus_reference", in the End range field. All the other fields must be left blank.
Note that instead of typing "plus_reference" in the End range field, you can select this ID by using the dialog box displayed by the button found at the right of the End range field.
Normally, that is, when "Mark current location" is selected, an indexterm element contributes to the back of the book index with its own page number. However, in some cases, it may be convenient to insert an indexterm at some place (typically in chapterinfo, sectioninfo, etc, elements) and specify that this indexterm corresponds to the page numbers of one or more other elements.
Example: let's suppose that the indexterm element is contained in a sectioninfo element and that the chapter about dogs has "ch.dogs" its ID. Back of the book index:
P
Pet
    Dog 22
specify Term=Pet, Term #2=Dog, select "Mark the elements having the following IDs" then specify Element IDs=ch.dogs.
Note that instead of typing "ch.dogs" in the Element IDs field, you can select one or more IDs by using the dialog box displayed by the button found at the right of the Element IDs field.
[1] Note that Ctrl+V, that is, the plain → command, would not work here.
[2] "" may be replaced by a variant called "" when the "MathML support" add-on is installed.
[3] For example, containing a callout element linked to several co elements. In such case, the numbering of co and callout elements done on screen by XMLmind XML Editor will not reflect what you'll get when you'll convert your document to HTML or PDF. However this limitation should not prevent you from specifying such multi-co callout elements if needed to.
[4] That is, it is not possible to ``promote'' the title of a section.
[5] That is, it is not possible to ``demote'' the title of a section.
[6] Type a value in the Value field and use auto-completion or use the button which is found at the right of this text field to display a specialized dialog box.
| | | |
| XMLmind XML Editor - DocBook Support |  | 2. The DocBook tool bar |
