DITA has two elements which allow specification of internal or external
links:
<xref> 
and
<link> .
The <xref> “inline element” may be contained in
any “block element”.
Both elements may contain text, though in the case of the
<link> element, this text must be wrapped in a
<linktext> child
element.
For both elements, the target of the link is specified by the value of
the @href attribute, which is an absolute or relative URL,
possibly ending with a fragment.
Examples:
1
2
3
4
5
6
7
8
9
10
11
12
13
|
<xref href="topic_structure.dita"/>

<xref href="http://www.xmlmind.com/xmleditor/"
      format="html"
      scope="external">XMLmind XML Editor</xref>

<link href="samples/sample_topic.dita#docbook_or_dita"/>

<link href="http://www.xmlmind.com/ditac/"
      format="html"
      scope="external">
  <linktext>XMLmind DITA Converter</linktext>
</link>
|
External links
The target of an external link is
any location outside the overall DITA document. This location may be an
absolute or relative URL. This location is not intended to be transformed
by the DITA processing software (e.g.
DITA Open
Toolkit or
XMLmind DITA Converter ).
 |
Remember
- Always specify a text for an external link, as the DITA processing
software has no way to automatically generate some text for such
links.
- Always specify the
@format attribute of the link
element. Example: given an URL such as
"http://www.xmlmind.com/ditac/", the DITA processing software
has no way to guess that this corresponds to an HTML file.
- Always specify attribute scope="external" for such links.
By doing so, you instruct the DITA processing software to use the
target location as is in the deliverable.
|
Internal links
The target of an internal link
(<xref> or <link> element)
is a DITA element belonging to the same DITA document. This target element
may be found in the same XML file as the link element or, on the contrary,
in a different XML file. The latter case is still considered to be an
internal link because both the link and its target belong to the same
overall DITA document.
Of course, in order to use a DITA element as
the target of a link, this element must have an @id
attribute.
The value of the @href attribute of a
link element is:
"URL_of_the_target_DITA_file#qualified_ID_of_the_target_element",
where:
- URL_of_the_target_DITA_file may be omitted when
both the link and its target are found in the same XML file.
- #qualified_ID_of_the_target_element
may be omitted if you want to address the first topic contained in an
XML file.
What is the qualified ID of the target
element?
- It's simply the value of the
@id attribute for a
topic element (of any kind: <topic>,
<concept>, <reference>,
etc).
- It's the value of the
@id attribute of the target
element prefixed by "ID_of_the_topic_ancestor/"
for any descendant element of a topic.
Example: Let's suppose you want to add an
<xref> element to
topic1.dita:
1
2
3
4
5
6
7
|
<topic id="t1">
  <title>Title of topic 1</title>
  <body>
    <p id="p1">Paragraph inside topic 1.</p>
    <p>More information in <xref href="???"/>.</p>
  </body>
</topic>
|
Let's suppose that you want to address elements
contained in topic2.dita, this file being found in
the same directory as topic1.dita.
1
2
3
4
5
6
|
<topic id="t2">
  <title>Title of topic 2</title>
  <body>
    <p id="p2">Paragraph inside topic 2.</p>
  </body>
</topic>
|
- If you want to address topic "t1", specify
href="#t1".
- If you want to address paragraph "p1", specify
href="#t1/p1".
- If you want to address topic "t2", specify
href="topic2.dita#t2" or more simply
href="topic2.dita".
- If you want to address paragraph "p2", specify
href="topic2.dita#t2/p2".
|
Remember
-
There is generally no need to specify the text of internal
links, as the DITA processing software can automatically generate this
text.
Example: converting the following paragraph to
XHTML
<p>More information in <xref href="topic2.dita"/>.</p>
may
result in something like:
<p>More information in
   <a href="page-23.html#t2">Title of topic 2</a>.</p>
This
probably works fine for any element having a title:
<topic>, <section>,
<table>, <fig>, etc.
However this cannot work for the other elements.
For example, do
not expect the DITA processing software to generate some text
for:
<xref href="topic2.dita#t2/p2"/>
Instead
explicitly specify some text:
<xref href="topic2.dita#t2/p2">this paragraph</xref>
-
Link targets are tedious and error prone to specify by hand.
Using a DITA-aware XML editor is therefore especially handy when it
comes to inserting link elements.
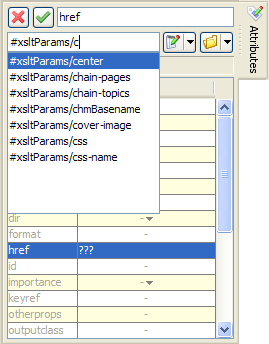
Figure 3. XMLmind XML Editor "Attributes Tool"
is DITA-aware: see its auto-completion feature in action
|