Inserting images
The easiest way to insert an image in your document is to
use the  Add image button found in the toolbar. After doing that, you still
have to specify the graphic file which is the source of the image.
Generally this is done by first clicking on
Add image button found in the toolbar. After doing that, you still
have to specify the graphic file which is the source of the image.
Generally this is done by first clicking on ![]() the image placeholder icon and then
using the Attributes tool to specify the graphic file. DocBook
example: clicking on the image placeholder selects the corresponding
the image placeholder icon and then
using the Attributes tool to specify the graphic file. DocBook
example: clicking on the image placeholder selects the corresponding
imagedata element. Then you have to specify a fileref
attribute for this element.
Inserting image in a document is a very common task that's why there are more convenient ways to specify the graphic file which is the source of the image:
- Double-click on the image placeholder. (Or equivalently, right-click on the image placeholder, then select "Set Image..." from the contextual menu.)
- Or drop an image file onto the image placeholder.
In both cases, this displays a specialized dialog box.
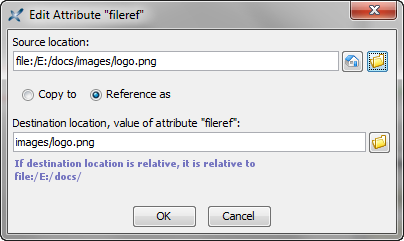
The "Source location" field allows to specify the graphic file which is the source of the image. The "Destination location" field allows to specify how this graphic file is to be referenced in the document. Note that this dialog box requires specifying URLs and not filenames.
For example,
let's suppose that your document is found in the docs/ directory
and that all your graphic files are found in the docs/images/
subdirectory. If you want to insert an image pointing to
docs/images/logo.png, then simply make sure that the
"Reference as" radio button is checked.
Now let's suppose you
want to insert C:\tmp\screenshot.png in your document. You'll
probably want to copy this file to docs/images/ subdirectory and
give it a more meaningful name (e.g. login_dialog_box.png). This
is done by checking "Copy to" and specifying
"images/login_dialog_box.png" in the "Destination
location" field.

