1. The DocBook menu
This menu item is present only if the document being edited is a DocBook version 4 document. Converts DocBook version 4 document being edited it to DocBook version 5.0, 5.1 or 5.2. A dialog box is displayed to allow choosing a DocBook version. A file chooser is displayed to allow choosing a save file for the DocBook 5 document.
Note that this command does not automatically upgrade the documents referenced in the document being edited (e.g. a
chapterincluded in abook). This has to be done manually for each referenced document. Once this is done, thexi:includeelements have to be edited by hand in the master DocBook 5 document after using → → in XMLmind XML Editor - Online Help.Displays a dialog box allowing to declare the collection of DocBook documents in which
olinkis used for cross-referencing. More information in Specifying the set of olink-ed documents.
Import the HTML copied to the clipboard by word processors or web browsers and intelligently paste it into the DocBook document being edited.
Extensive efforts are made to decently support the “non-filtered HTML” copied by MS-Word to the clipboard.
When an application other than MS-Word is used, the quality of the result you'll get in XXE highly depends on what has been copied to the clipboard. In all cases, XXE tries very hard to import something simple, clean and valid at the expense of the fidelity to the original data.
In addition to HTML, this menu entry can also import
 Markdown whose text source has been copied to the clipboard by text editor or web browsers. Markdown support is documented in the description pane of the "Install Add-ons" dialog box, Uninstall tab, when the "Paste from Word Processor or Browser" add-on is selected. This documentation is also found in "Paste from Word Processor or Browser".
The pasted data replaces the text or node selection if any. When there is no selection, XMLmind XML Editor automatically determines a valid insertion location at or following the caret position.
If XMLmind XML Editor fails to find such valid insertion location, the rich text is converted to valid DocBook and then copied to the clipboard, overwriting the original data put there by the third-party application. This allows to use the “normal” , or commands to paste the data elsewhere in the document.
![[Tip]](images/tip.svg)
This menu entry allows not only to paste snippets copied from word processors or web browsers, but also to import entire documents or HTML pages. In order to import the entire document into XXE:
Open the document in the third-party application.
Press Ctrl+A (Select All) then press Ctrl+C (Copy) to copy it to the clipboard.
Create a new DocBook document in XXE by using → .
Use → to save this new DocBook document to disk.
Explicitly select the root element of the DocBook document, for example by clicking on its name in the node path bar.
Select menu item "" to paste the content of the clipboard[1].
If, using MS-Word, you want to copy a piece of text rather than a paragraph, do not include the hidden character found at the very end of a paragraph (the paragraph mark) in your selection.
- Other menu entries
The following entries of this submenu allow to paste the plain text copied to the clipboard, typically using a third-party word processor or spreadsheet, as:
one or more paragraphs,
OR a
programlistingelement,OR one or more list items,
OR an itemized list,
OR one or more table rows,
OR a table.
The last two menu entries assume that each text line specifies a table row and that, within a text line, the contents of the table cells are separated by tab characters.
If you need to paste the copied text as an ordered list, first paste this text as an itemized list then convert the pasted list to an ordered list using → (Ctrl+T).
The following entries of this submenu allow to paste the image copied to the clipboard as:
inlinemediaobject,mediaobject,figure.
Menu entry "" replaces the text or node selection if any. When there is no selection, this menu entry pastes its element at caret position (just like → ).
All the other menu entries also replace the text or node selection if any. When there is no selection, these menu entries paste their elements at any valid position in the document following the caret position.
- ,
 [2]
[2] Keyboard shortcut Ctrl+Shift+SPACE. Replace Markdown markup found all the text nodes of explicitly or implicitly selected element by equivalent DocBook elements. Supported Markdown markup: italic, bold, code, highlight (replaced by
emphasisrole=underline), subscript, superscript, link, image, heading (replaced bybridgeheadwith attributerenderas), unordered list item, ordered list item.DocBook 5 example (notice the space character after "
1."; this space character is required after all the different “block prefixes” "#", "##", "-", "*", "1.", etc):<para>* <trademark>Dart</trademark> is a *programming language*. See [Dart](https://dart.dev/).</para>
is replaced by:
<itemizedlist>
  <listitem>
    <para><trademark>Dart</trademark> is a
    <emphasis>programming language</emphasis>. See
    <link xlink:href="https://dart.dev/">Dart</link></para>
  </listitem>
</itemizedlist>
Converts an “informal element” to/from a “formal element” having a title.
This command currently works for
informaltable/table(CALS tables only, not HTML tables),informalfigure/figureandinformalexample/example.Links a sequence of
calloutelements to the corresponding sequence ofcoorareaelements (and, of course, also the other way round).Useful information about callouts is found in DocBook XSL: The Complete Guide by Bob Stayton: Program listings, Annotating program listings, Callouts.
In order to use this command, you need to:
Create a
programlistingcontaining a number ofcoelements. No need to specify the ID orlinkendsattributes for thesecoelements.Note that this command also works for any element containing
areaelements rather thancoelements (e.g. aprogramlistingco).Add a
calloutlistelement somewhere after theprogramlisting. No need to specify the ID or arearefs attributes for thecalloutelements.![[Important]](images/important.svg)
Make sure to create exactly the same number of
coandcalloutelements. This is needed because theNthcoelement will be linked to theNthcalloutelement.Explicitly select the node range comprising both the
programlistingand thecalloutlistelements.In fact, you can explicitly or implicitly select any element containing, at any nesting level, a sequence of
coorareaelements followed by a sequence ofcalloutelements. For example, if yourprogramlistingandcalloutlistelements are contained in aprogramlistingcoelement, simply click anywhere inside theprogramlistingcoelement.Select → .
The following dialog box is displayed:
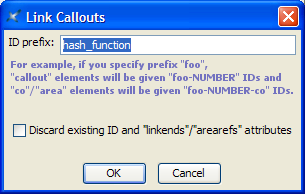
Specify a prefix for the IDs which will be automatically generated for the
coand thecalloutelements. The links (linkendsandarearefsattributes) between thecoand thecalloutelements of course need to refer to these IDs.Click .
Notice that the above dialog box has a "Discard existing ID and linkends/arearefs attributes" checkbox. This checkbox is needed because the "" command has been designed to be used, not only on newly created
programlistingpluscalloutlistelements, but also on existing, possibly hand-written, possibly complex[3]programlistingpluscalloutlistelements.When the
coandcalloutelements found inside the node selection are found to already have ID attributes, this checkbox is enabled and, by default, unchecked. When this is the case, running this command will affect only the newly createdcoandcalloutelements. All the existing IDs and links will be left unchanged.This command also works with image maps → is also designed to work with the DocBook equivalent of HTML image maps.
An easy way to create an image map pointing to a
calloutlist describing areas of interest in the image is to proceed as follows (DocBook 5 example):Use tool bar button "" and select "" to add a
mediaobjectelement containing animageobjectcoelement to your document.Specify which image file to use, for example, by right-clicking the image placeholder and then selecting "" from the contextual popup menu.
Right-click anywhere inside the newly inserted
imageobjectcoelement and select "" from the contextual popup menu.Use the image map editor in XMLmind XML Editor - Online Help to add “hot areas” to your image. Do not bother setting the links of any of these hot areas because there is a way to do this automatically.
Add one
calloutper hot area to thecalloutlist. The number and order of the callouts must match the number and order of the hot areas because this is how the correspondence between a hot area and a callout is established. Do not bother setting the links of any of these callouts because there is a way to do this automatically.Use → to link the hot areas to the corresponding
calloutelements (and the other way round of course).
If the caret is anywhere inside an
indextermelement or if a single element or node is explicitly selected anywhere inside anindextermelement, this menu item displays anindextermeditor dialog box allowing to modify thisindextermelement.Otherwise, this menu item displays an
indextermeditor dialog box allowing to create a newindextermelement and then to insert it at caret position.If some text has been selected, field Term of the dialog box is automatically initialized with the text selection. Therefore the simplest way to create an
indextermelement is first to select the term in the body of the document, then invoke and finally click .Move selected element up, that is, swap it with its preceding sibling node. Requires the element to be explicitly selected.
Move selected element down, that is, swap it with its following sibling node. Requires the element to be explicitly selected.
To make it simple, increase the level of selected subsection (e.g. a
sect2element is converted to asect1element).Requires a ``subsection'' (
section,sect1,sect2,sect3,sect4orsect5) or an element which is contained in the body[4] of the section to be explicitly selected.If a subsection is selected, this subsection becomes a sibling of its parent section. Example:
sect2element havingid="C" is ``promoted'':<sect1 id="A">... <sect2 id="B">... <sect2 id="C">... <sect2 id="D">...This results in:
<sect1 id="A">...
  <sect2 id="B">...
<sect1 id="C">...
  <sect2 id="D">...
If another type of child element is selected, this element is wrapped in a newly created section which becomes a sibling of its parent section. Example:
paraelement havingid="C" is ``promoted'':<sect1 id="A">... <para id="B">... <para id="C">... <sect2 id="D">...This results in:
<sect1 id="A">...
  <para id="B">...
<sect1>...
  <para id="C">...
  <sect2 id="D">...
To make it simple, decrease the level of selected section (e.g. a
sect1element is converted to asect2element).Requires a ``section'' (
chapter,appendix,section,sect1,sect2,sect3orsect4) or an element which is contained in the body[5] of the section to be explicitly selected.If a section is selected and if this section is preceded by a section of the same type, this section becomes a subsection of its preceding sibling. Example:
sect1element havingid="C" is ``demoted'':<sect1 id="A">... <para id="B">... <sect1 id="C">... <para id="D">...This results in:
<sect1 id="A">...
  <para id="B">...
  <sect2 id="C">...
    <para id="D">...
If a section is selected and if this section is not preceded by a section of the same type, a new section is created and selected section becomes a subsection of this new section. Example:
sect2element havingid="C" is ``demoted'':<sect1 id="A">... <para id="B">... <sect2 id="C">... <para id="D">...This results in:to declare the collection of DocBook documents in which olink is used for cross-referencing. How to do this is explained in next section.
<sect1 id="A">...
  <para id="B">...
  <sect2>...
    <sect3 id="C">...
      <para id="D">...
If another type of child element is selected, this element and all the other ``body elements'' which follow it are wrapped in a newly created subsection. Example:
paraelement havingid="C" is ``demoted'':<sect1 id="A">... <para id="B">... <para id="C">... <para id="D">... <sect2 id="E">...This results in:
<sect1 id="A">...
  <para id="B">...
  <sect2>...
    <para id="C">...
    <para id="D">...
  <sect2 id="E">...

Keyboard shortcut F8. Checks all the links to external resources found in the document being edited. All kinds of external resources are checked for existence: images, audio, video, PDF documents, HTML pages, etc. When the resource is an HTML page and the link ends with a fragment (e.g. "
#bar" in "../doc/foo.html#bar") then this fragment is also checked for existence.
[1] Note that Ctrl+V, that is, the plain → command, would not work here.
[2] "" may be replaced by a variant called "" when the "MathML support" add-on is installed.
[3] For example, containing a callout element linked to several co elements. In such case, the numbering of co and callout elements done on screen by XMLmind XML Editor will not reflect what you'll get when you'll convert your document to HTML or PDF. However this limitation should not prevent you from specifying such multi-co callout elements if needed to.
[4] That is, it is not possible to ``promote'' the title of a section.
[5] That is, it is not possible to ``demote'' the title of a section.