Setting attributes
The Attributes tool allows to edit the attributes of selected element. This tool is disabled (i.e. grayed) when some text or multiple nodes are selected.
The Attributes tool comprises two parts:
- The upper part, a small form, which supports auto-completion and specialized attribute editors (specialized dialog boxes).
- The lower part, a larger table, which displays all attributes. This table also allows the user to set attributes on the selected element.
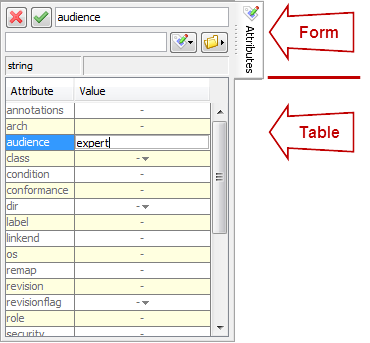
The attributes table
The most basic way to specify the value of an attribute is to
type it in the lower part, the attributes table. For example, let's
suppose you are authoring a DocBook article. Specifying the
audience attribute of the root article element consists
in
- selecting the root element,
- clicking on the
audiencerow, - typing, for example "
expert", in the Value cell, - and finally pressing Enter to commit the change.
In some cases, for example the class attribute of
article, the Value cell contains a drop-down list. In such
case, suffice to select an item from this list.
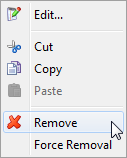
If you want to
remove an attribute, do not specify its value as the empty string.
Instead, right-click on its row in the attributes table. Doing
this pops up a menu allowing to perform various actions on the value of
the attribute being clicked upon. Among these actions, you'll find  Remove.
The attribute form
The
upper part, the attribute form, is often used for its specialized
attribute editors. For example, let's suppose you have inserted a
figure in your document. You may want to give an ID to this
figure:
- First select the
figure, - then click on the
xml:idrow in the attributes table, - and finally click the
 Edit button.
Doing this pops down a menu, the very same menu which is
displayed when you right-click on a row of the attributes table. This menu
has an  Edit
item.
Edit
item.
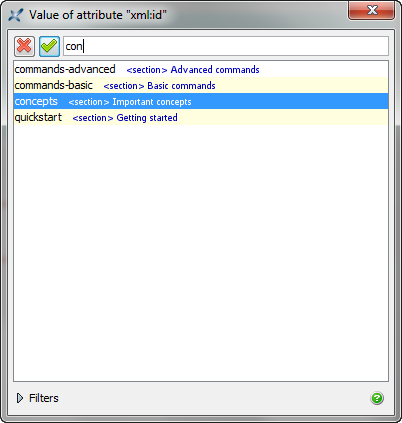
This Edit item always displays a specialized dialog box
allowing to edit an attribute “more comfortably” than with the attribute
form or the attribute table. In the case of the xml:id attribute,
the specialized dialog box will show you all the existing IDs. This way
you'll be able to type an ID which does not already exist.
The figure you have
inserted contains an imagedata element. Its required
fileref attribute allows to specify the graphic file which is the
source of the image. In order to specify a value for the fileref
attribute,
- first click on the image placeholder icon to select
imagedata, - then click on the
filerefrow in the attributes table - and finally click the
 "Choose file" button.
Doing this displays a file chooser dialog box (or an URL chooser dialog box, if you have checked FileUse the URL Chooser).

