8.2. Using the Compare tool
The Compare tool is displayed at the left of the main window after selecting menu item → → .
In order to compare two documents using the Compare tool, you must select these documents using the comboboxes found at the top of the tool. These comboboxes list all the documents opened in XMLmind XML Editor. However you can only choose two revisions of the same initial document (see Section 8.1, “Why use the Compare tool?”).
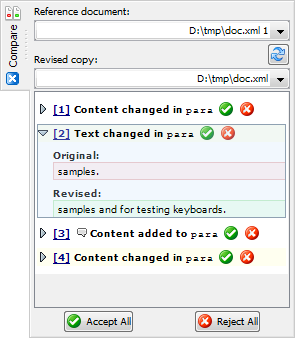
In the above screenshot, notice the  icon which indicates that a change contains one or more remarks.
Below the comboboxes is found an interactive pane containing the list of changes made in the revised copy to the reference document:
Click on a change to select it.
Doing this gives the keyboard focus to the interactive pane and thus allows to use keyboard shortcuts (see below) rather than the mouse.
Click on the number of a change or double-click anywhere in a change first to explicitly select the changed elements in the document views and second to center the changed contents in these views. Doing this allows to clearly see what happened.
Click on the triangle icon to expand/collapse the corresponding change.
Click on
 to accept the selected change. However, if there are changes which are similar to the selected change, the button displays a popup menu letting the user choose between "" and "". The second menu item is especially handy if for example, you have used "Replace All" in the revised document.
Click the
Accept All button to accept all the remaining changes.Accepting a change means approving the contents found in the revised copy.
Once a change has been accepted, it is removed from the list and the corresponding marks are removed from the document views.
Click on
 to reject the selected change. However, if there are changes which are similar to the selected change, the button displays a popup menu letting the user choose between "" and "". The second menu item is especially handy if for example, you have used "Replace All" in the revised document.
Click the
Reject All button to reject all the remaining changes.Rejecting a change means restoring in the revised copy the original contents found in the reference document.
Once a change has been rejected, it is removed from the list and the corresponding marks are removed from the document views.
Press Up to select the preceding change. Press Down to select the following change.
Press Enter first to explicitly select the changed elements in the document views and second to center the changed contents in these views. Doing this allows to clearly see what happened.
Press Space to expand/collapse the selected change.
Press F3 to accept the selected change. Press F5 to accept all the remaining changes.
Press F4 to reject the selected change. Press F6 to reject all the remaining changes.
If you modify the revised copy, it's possible to quickly update the list of changes by clicking
 .
.
![[Tip]](images/tip.svg)